Saturday, May 26, 2012

AutoGardens-late May 2012 -No Talk - just photos!

Nyack Community Garden......
Overview
May 26
Tomatoes with moveable supports and a few scattered marigolds
May 26
Autogarden rack with various plants
May 26


 Side Garden at home.......
Overview of side garden (autogarden with netting in foreground)
May 26
Complete autogarden with AWL, tray cover and watering controller (not visible)
May 26

Almost Blue berries inside netting
May 26

Ripe strawberries outside the pot
May 26
Rotten strawberries Inside the pot
May 26


Patio step garden at home...
Step garden
May 26

Wednesday, May 23, 2012

AutoGardens- May 2012-More construction details, a major design change, and a battle with mosquitoes

Reversion back to Archimedes Water Lifters

In the world of engineering, sometimes the change in one design component opens up opportunities to return to earlier designs of other components.  Such is the case with the impact of a shallow water tank and the method for lifting the water up to the tray.  I had abandoned the Archimedes water lifter  approach in favor of the spiral pump because it can be modified to work with deep water tanks such as garbage cans.  Once I started making the first actual batch of eight AutoGarden stacks though, the ease of construction and reliability of the Archimedes water lifter (AWL) put it back into the race.  A day or two of development and I had the final version of the water lifter concept - a short AWL descending into the water tank and spilling its contents into a drain trough connected to the tray.


The smaller size of the AWL permits the cover to be considerably smaller and unobtrusive.  Pictured below is the cover for the AWL and you can see that it is about the same height as the top of the buckets and takes up only 2/3rds of the width of the rack. The remaining space is used as a place to pour water into the tank as needed.

Mosquitoes and water conservation.

This spring has been quite damp and major swarms of mosquitoes are expected when the weather turns warm.  In that the standing water of the tanks and trays could serve as a nice environment for the larvae, I am making a major effort to restrict the access of the adult pests to the water.  These attempts have the secondary effect of minimizing the water losses through evaporation.  To accomplish these goals I have added yet one more layer to the stack.  This layer (again made of 1" styrofoam) is a cover for the tray.  

The cover has ten large holes cut into it and after the cover is in place, the buckets are dropped through the holes and onto the tray surface below.  The holes are beveled in such a way that the weight of the bucket slightly compresses the edge of the tray cover and creates an air tight/mosquito tight seal.  Although I haven't had enough warm days to test the theory, it is thought that the evaporation of the soil in the pots and the transpiration of the plants will routinely remove all the water in the tray and provide a further detriment for the mosquito larvae survival.

Coming up... construction photographs and step-by-step construction details

My daughter is home from college for the summer and she is acting as my employee for the new business that I am starting (LookAliveWindowShows.com).  Before she starts in earnest with those duties I am having her help me with the documentation.  I am an inventor - not a writer.  Next blog should include early results of her efforts and some photos of early successes in the AutoGardens.  Stay tuned (Do people say that anymore in this digital age?)

Dr Dunc

Sunday, April 22, 2012

AutoGardens April 2012 - Some construction details - Part 1

First part of construction details and some preliminary growing results


 In the full-size Nyack plot.  The shortest stack uses a ground tank.  The next one uses 2x4's in the support layer for the tank.  The tallest four use 1x6's for the tank support layer.  Overall dimensions of all are 2'x6'.  Total height of the whole stack is (top to bottom >3 +2.5 +7 +5.5) 18".  No spiral pumps installed yet.  Note how well the lettuce and cabbages are doing.  Remember that it is only April 22nd. (and New York)

 In the side yard.  Shows the housing for the spiral pump.  They will be painted the same green as everything else

Spiral pump under construction.  Uses 1/2" pvc pipe.  There are two types of pvc pipe.  I learned last night that this type is rated for drinking water and is about twice as expensive as the other - but the fittings are about half the price.  I seem to be able to make two spiral pumps from one 12' piece of pipe so there probably isn't a good reason to change.  Local suppliers don't seem to carry a four way connector  so I had to make my own out of two tee's. The sprocket is made from 3/4 thick vinyl trim board into which I drill 48 holes of 5/16ths.  I then cut out the piece using the band saw and drill a 5/8ths hole for the center pipe.  The center pipe has four 9/64ths holes drilled at 90 degrees at the point where the pipe will be inside the 4-way connector in the center of the spiral.  The center pipe has a cap on one end.  The cap is just a pressure fit so that I can take it off and put it on the other end if I want to pump out the tank instead of directing the flow to the tray.


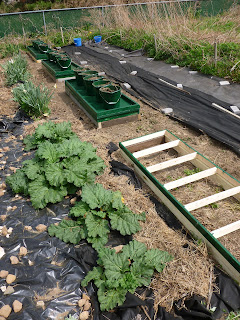
Pearl River NY  Garden plot under construction.  In foreground you will see some rhubarb.  The racks are at various stages of completion.  First one just has frame for ground tank and tray support layer but no pit dug for the plastic sheet.  Notice the extensive use of weed blocker fabric.  It has been a dry spring but the real test should come this week as we are supposed to get 2 to 3 inches of rain in the next two days.  I must finish covering the ground pronto!  The first four production spiral pumps will go into this garden because at over $4 a gallon of gas, I want to visit these gardens as infrequently as possible.

Friday, April 20, 2012

AutoGardens April 2012 - Introduction to changes from 2011

This should be an exciting year in the AutoGardens.  The experiences from Year 1 are the basis for some dramatic changes.  I am busy making those changes right now so I can't go into too much detail at this time.

Below are the changes and the reasoning for making the changes

1-New style of water lifter.
The Archimedes-style water lifter takes up too much space since it can't stand vertically.  Also the motor that I used to drive it costs around twenty dollars.  The new style of water lifter is based on a spiral pump made from 1/2" PVC piping and took all winter to develop and test.  It is run by a $4 motor and three AA batteries.

2-Individual racks
The issue with the failure of the vertical water lifter while I was on vacation has convinced me that I need a bit more redundancy in my set up.  So now I have developed racks that are 2 feet wide and 6 feet long and each rack has a water lifter.  The high number of racks (currently 13 racks with 10 buckets on each rack) means that I will be able to collect a lot more information for improvements next year.

3-Uniform appearance
Everything is painted in Rustoleum Hunter green oil-based paint.

4-Integral water tanks
Each rack has its own water tank.  This keeps everything neat and tidy.  No need for interconnected tanks and siphon hoses.

5-No solar collectors
The new pumps will run much less often because I will have new style water controllers on each rack.  The three AA batteries are estimated to run for half the summer.  I can buy them for 25 cents each

6-Intensive use of Pink Foam Board.
Wherever possible this light weight insulating material (1" thick) is used for the construction.  It can be painted with the Rustoleum paint and can have nice water-tight seams using silicone caulk adhesive and long decking screws. It isn't strong so I am using various support layers in the racks

Wednesday, December 21, 2011

AutoGardens mid December 2011 - Part 4-Step garden for flowers [summary]

AG-06  Step-style AutoGarden for flowers

[refer to earlier posts for general information about AutoGarden styles and naming and other results]

This autogarden consists of three troughs that are approximately 8 feet in length, ten inches in depth and ten inches in height.  The ends of the troughs are open.  Refer to the picture below for the rest of the description.

The AWL is on the left and connects a tank on the ground to the left end of the upper trough.  The  right end of the upper trough is connected to the right end of the middle trough and the left ends of the middle and lower troughs are connected together.  The right end of the lower trough is connected to a plastic tank and that tank is connected by a siphon hose to the first tank (with the AWL on the left)

Since the step garden is located on a patio and close to electricty, the motor was powered by an adapter.  The water flow was controlled by a water controller consisting of a pair of electrical contacts that were connected through a mechanical connection to a sponge.  The sponge was in the flow of water exiting from the lowest trough and, when wet, would be heavy and this weight would break the connection between the motor and its source of power.  When the sponge had dried out sufficiently (a reflection of the general dryness of the plants), it would be lighter and allow the electrical contacts to touch and turn on the AWL again.

The automatic filling of the tanks was accomplished by a low cost electric water pump (such as those used in fountains) that was placed in the tank of a toilet.  The electric source for the pump was on a timer set to turn on for 15 minutes each day.  The outflow from the pump was connected to a small diameter plastic hose that went out the window of the bathroom and then into a garden hose where it flowed by gravity to the tank.  Important in this setup was that the small hose and the garden hose not be an air tight connection.  If there is an air tight connection, a siphon situation exists and the water will flow continuously through the pump in the tank of the toilet into the tank of the step garden.

Results

Geraniums
These did very well and were in constant bloom until a hard frost in mid December.  Deadheading was needed about once a week.
early July

Impatiens
These did well until mid October.  No deadheading was needed
mid August

Begonias
Another success and were in bloom until mid October- at which time I brought them inside and have them growing nicely in the living room wind (AG-02).  Cuttings were also taken at that time and they have rooted under the lights of AG-01 in the basement and are in pots.  No deadheading was needed when the plants were outside.  I guess the breezes blew off the old flowers from time to time.
Photo taken in mid October

Ageratums
Though they were a pleasant source of blue color when the were in bloom they didn't stay in bloom long enough to justify planting next year
Photo taken in early July

Marigolds
Lovely flowers until mid November.  I deadheaded them from time to time but no other labor was needed
Photo taken in early July

Celosia
Flowered as normal but after going to seed weren't worth keeping and were discarded in mid season.  By that time the impatiens and begonias were clamoring for space so some rearrangements of the locations occurred.  

Verbena
Another poor performer

Nicotiana
Another poor performer

Miniature Roses
These did remarkably well and grew and flowered throughout the summer.  They are now in my living room window (AG-02)
photo taken in mid August

Petunias
Did well as long as the garden had lots of sun.  Towards mid August the step garden only had an hour or so of full sun per day.  I moved the plants to a different location in my yard and planted them in the ground and they perked up
photo taken in early July

Gazanias
Poor performer


Wednesday, October 26, 2011

AutoGardens status Mid October 2011-Part 3-vines

For an introduction to the AutoGardens see the fine blog of Jennifer Hausler (Sept 7 and July 29 posts)

See below for Parts 1 and 2 of this series

AG-05  Outdoor AutoGarden for vines

Of the seven types of autogardens, this was probably the most experimental this year.  Going into the growing season,  I surmised that growing large, vine-type plants in relatively small containers would challenge the ability of the plants to get enough sustained moisture and nutrients.

As will be seen here,  the autogarden had mixed results but most of the issues were not related to the ratio of the plant size to the pot volume, they were due more to the reliability of my construction technique and the lack of attention during my summer vacation travels in late July and early August.

But first, a general description of AG-05 - the autogarden for vines.

The main layout of the garden was a 30-foot long rack made from wood and covered with plastic that was about 10 inches wide and sloped from a height of about 5 feet to about 3 feet.  At the high end, a long Archimedes water lifter (AWL) raised water from a tank on the ground to the end of the rack.  At intervals of approximately 5 feet, secondary racks were constructed consisting of horizontal wood frames with metal fencing on the upper surface.  The fencing served as support for the vines and, eventually, the squashes and melons.  The secondary racks were connected to the main rack at 90 degrees and the widths of the secondary racks was such that there was a narrow open area between each rack.

At the lower end of the long rack, the water drained into a large plastic container and that container was connected by a siphon hose to the tank at the upper end of the rack.  Additional reservoirs were connected to these two tanks by siphon hoses so that the entire volume of water stored was quite large.

A solar panel was provided to power the motor of the AWL whenever the sun was shining.

The plants were put into 2.5 gallon blue buckets and placed on the racks.  Most of the plants were obtained as seedlings from a local garden supply store.

The entire garden was in full sun for most of the day.

Results

This autogarden was a moderate success.  It certainly confirmed that the standard size pot was adequate for growing the vines and that having the entire plant off the ground was not harmful.  No animal damage was noted at any time even though ground hogs and rabbits were often seen within the garden plot perimeter.

Until the water system failed completely, the watering system seemed adequate.  Some of the squash plants showed evidence of wilting during the hottest part of the day -especially when it was windy.  The plants recovered fully during the cooler parts of the day and evening and were fine when the days weren't too  hot.

Watering failure.

While I was on vacation, the bracket that held the motor for the AWL failed and caused the coil part of the pump to start rubbing on the edge of the rack.  Though the motor continued to turn whenever the sun was shining, the rubbing action eventually wore a hole in the side of the coil and the water was no longer raised into the high end of the rack.  When I returned from my vacation in early August I harvested what I could and abandoned the autogarden.  The results and photographs below reflect the successes until the system failure.


Watermelons
These grew quite nicely and were on their way to about 6 small melons.  At the time of the failure I harvested the ripest of the fruit and tasted it.  The fruit was soft and very sweet.

Cucumbers
I collected a dozen or so before the failure.  The cucumbers were full size and very tasty

Cantaloupes
None of these reached maturity but seemed to be heading for a healthy crop
Zucchini squash
Since I don't especially like the large baseball bat size fruit, I collected these while they were under ten inches in length.  These plants didn't have a vining habit so all the squashes were found in the pots

Honeydew melon
Like the cantaloupes these melons did not reach maturity before the watering failure

Strawberries
I grew two pots of strawberries for harvest next year.  The plants grew nicely and had a dozen or so runners that descended from the rack down to the ground in the garden plot.  I shall over-winter the plants in their pots in the side yard of my house.

Recommendations for next year

Add a water controller so that the pump only runs when needed - this should avoid wearing out the motor and the bracket that holds the motor.

Have someone check on the garden while on vacation

Possibly grow a second crop of leafy vegetables under the racks that hold the vines.  There seems to be plenty of light getting through before the vines have extended across the rack and then the vines should provide shade to the plants when the sun is its hottest.  A second AWL would be needed to water this second system.

Saturday, September 10, 2011

AutoGardens status Mid August/mid September 2011- Part 2

For an introduction, see Jennifer's Hausler's fine blog  for a description of the autogardens and the Archimedes Water Lifter  (July 29th and September 7th blogs)
See Part 1 [below] first to become familiar with the seven styles of autogardens that I have developed so far
And now for an  update on some of the gardens....

AG 04 - Nyack Community gardens

Tomatoes
General appraisal
The two varieties (Beefsteak and Roma) have done well and will be grown again next year.  The overall heights of both types had made it awkward to leave them at the plot because they were starting to shade the neighbor's plants.  Accordingly, most of the plants were moved to AG 07 after its construction was completed. As of this date(September 10th) I have harvested over 350 tomatoes

Growth density
An attempt was made to increase productivity by putting many plants into the same pot.  The theory was that water would no longer be limiting and that as long as there were enough nutrients and sunlight, the plants would thrive.  The results bore out this assumption in most cases.  There were issues with rotting on the end of the fruit (see figures 1 and 2).  Whether the rot is due to a lack of ventilation is not clear because other tomato plants at the community gardens also had these problems. 
Figure 1.  High density growth of tomatoes

Figure 2.  Rot on tomatoes

Staking of the plants
Tomatoes can grow to a great height.  In addition to the shading problem indicated above, the height can create two additional problems with a container-based approach: 1) a tendency to topple over in the wind and 2) a need to suspend the vines.

For the first issue, every attempt was made to keep the pots moist.  There were some hot, windy days though in late July when the plants were tall and laden with fruit and the plants toppled over.  Though larger and heavier pots would solve this problem the added weight on the racks would lead to additional complications.  After some experimentation a simple method for connecting the plants together through a horizontal pole at about 4 feet above the top of the pots was found to be sufficient.  This approach was successful in AG 07. The plants didn't topple over - even in Tropical Storm Irene.

For the second issue,  three vertical stakes were placed in each pot and pushed down to the bottom.  The stakes were about 4 feet in length and had their ends trimmed to be pointed to ease insertion.  As the plants grew in height, horizontal cross bars were added and the plants were constrained within the volume defined by the stakes and cross bars.  Several different approaches were taken in attaching the cross bars (direct attachment with metal screws, rubber bands, bands made from inner tube, and approximately 8 inch lengths of plastic coated wire.  UV radiation caused the rubber bands and inner tube loops to fail.  The screws were too much work and the wire ties, although more awkward to tie, did the best job of holding the cross bars to the stakes.  See figure 3.

Figure 3.  Horizontal crossbars and rubber inner tube loops
Nutrition
One advantage of growing plants in containers is that the levels of nutrients can be controlled better than when the plants are in the ground.  Since nearly all the water the plants receives comes from below a slow-release form of fertilizer placed directly on or in the soil was considered.  I had previous experience with Osmocote Classic smart release granules in my ground-based gardens so I tried it with the autogardens.  I liked that the label said that it was difficult to over-fertilize because I knew that I was going to be doing a lot of learning along the way.

It turns out that using the Osmocote gave me a wide range of fertilizing options.  I added the granules to the soil of the seedlings in the AG 01. Added some more when I was growing them in the greenhouse as seedlings with AG 03 and added granules a few more times during the season when the plants were in the full size pots in AG -04 and AG 05 and AG 06.  They worked great and the plants always seemed to have a healthy green color.

Lettuce (from seeds started in AG-01)
I started Black seeded simpson seeds in the basement autogarden (AG-01) tand eventually moved them to the Nyack Community garden autogarden (AG-04) without a stint in the greenhouse.  The plants did as well or better than my previous years of lettuce in the ground.  My favorite aspect was that the leaves aren't splashed with dirty water from the ground so you can eat the leaves right out in the garden without rinsing.

Swiss Chard (from seeds started in AG-01)
I grew the Rhubarb type.  This also did extremely well - even at a high density.  With moderate picking through the season I have managed to keep the plants.  Now with cooler weather I expect a fine fall crop from the same plants that were started many months ago in my basement with AG-01.

Peppers (Red, Yellow, and Green) (from plants purchased at a garden center)
These did very well too. I have had a continuous harvest for several months now (September 10th).  Some of the plants have reached a size where they have needed to be staked and I used the same approach as described above for the tomatoes.

Peas (from seeds started in AG-01)
These plants produced tasty pods but I won't grow them again in the AutoGarden because the yield wasn't great enough to justify giving up the space to them.

Onions (from onions sets)
Another fine AutoGarden success.  I didn't think that my watering system would allow root-type crops to be successful because I anticipated that the constant moisture would create a rotting situation.  I was wrong.  The onions are doing very well.

Celery (from plants purchased at a garden center)
These plants have done extremely well too.  Again I planted them at high density.  This was probably a mistake in this case because it was difficult to harvest one plant without damaging the plants next to it.

Broccoli
Plants are doing well but I haven't harvested anything.  The plants went into flowers while I was on vacation so I am back to eating only the leaves.
Beans (from seeds started in AG-01)
The plants have done well.   These plants tell an interesting story about the effectiveness of the AutoGardens in preventing the occasional munching of ground-based animals.  The plants had been growing quite nicely on the AutoGardens all season but when the hurricane was approaching, I put them on the ground for fear that they would blow off and be damaged.  It turned out that the neighborhood varmits used this chance to eat them almost entirely - pods, leaves and stems.  Another crop (and some of the plants that I didn't put on the ground) are doing well.